
Table of Contents
Who doesn’t love Lunchables? Whether you’re craving a quick and tasty bite or packing a fun meal for the kids, these DIY versions will take your favorite snack to the next level. While store-bought Lunchables uploaded options are convenient, making them at home gives you more control over ingredients, flavor, and nutrition. Imagine transforming a simple lunch into the best lunch near me customized exactly how you like it.
As a world-class chef, I, Chef Sophie LeClair, am here to show you how to recreate and elevate Lunchables with fresh, wholesome ingredients. These six recipes are not only quick and easy but also packed with flavor, ensuring every bite is as delicious as it is satisfying. Whether you’re a busy professional, a parent looking for healthier lunch ideas, or simply a fan of creative snacks, these homemade Lunchables will become your go to meal prep solution.
Let’s dive into what makes these Lunchables lead the way in taste, convenience, and fun.
Why These Homemade Lunchables Are a Game-Changer
Store-bought Lunchables may be convenient, but nothing beats a homemade version that’s fresher, healthier, and more delicious. Whether you’re prepping for a quick lunch, a school snack, or an on-the-go meal, these DIY Lunchables give you complete control over flavors and ingredients. No more worrying about preservatives or processed additives just wholesome, tasty, and fun meals made in minutes.
What Makes Homemade Lunchables Better?
Here’s why these Lunchables lead the way when it comes to taste and quality:
* Healthier Choices – Skip the additives and choose fresh, high-quality ingredients * * *Customizable & Fun – Mix and match proteins, cheeses, crackers, and sides to suit any craving.
*Budget-Friendly – Homemade Lunchables uploaded cost less than pre-packaged options.
* Kid-Approved & Adult-Friendly – Great for school lunches, work meals, or road trips.
* Easy Meal Prep – Make them in advance for a grab-and-go snack anytime.
Lunchables Nutrition Comparison
| Feature | Store-Bought Lunchables | Homemade Lunchables |
| Ingredients | Processed meats, artificial flavors | Fresh, whole ingredients |
| Cost | Higher per serving | More budget-friendly |
| Nutrition | High sodium, added sugars | Healthier, balanced choices |
| Customization | Limited options | Endless variety |
Chef Sophie LeClair’s Tip: Want to make these Lunchables even more exciting? Try adding fun dips like hummus or guacamole, or go gourmet with artisan cheeses and whole-grain crackers.
Now that you know why homemade Lunchables are the best lunch near me choice, let’s dive into the ingredients you need to get started.
Ingredients for the Best Homemade Lunchables
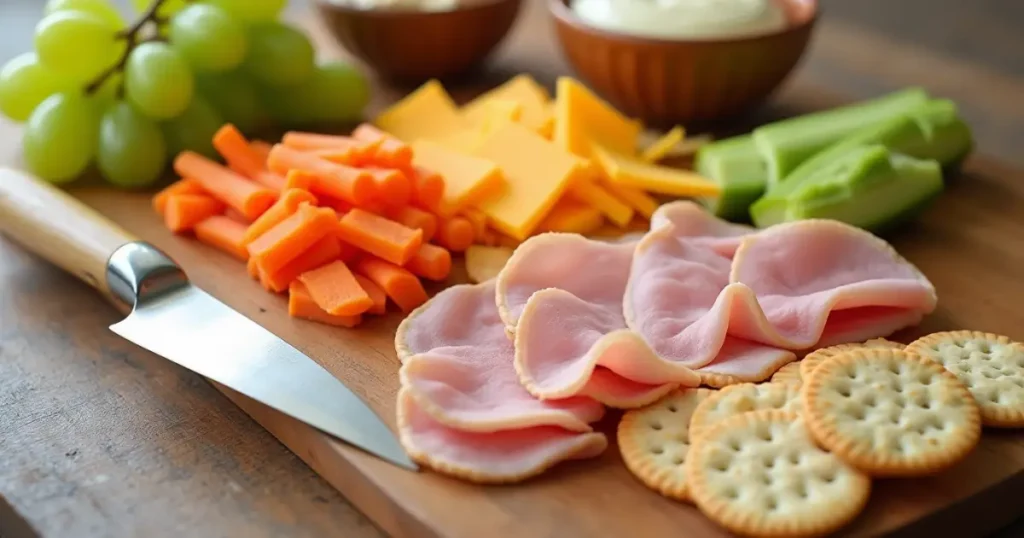
The key to creating Lunchable that are both delicious and nutritious starts with the ingredients. With just a few simple, fresh items, you can assemble a variety of combinations that will please both kids and adults alike. Here’s what you’ll need for a quick and tasty DIY version:
Essential Ingredients
- Proteins
- Deli meats (turkey, ham, or chicken)
- Hard-boiled eggs
- Mini meatballs (homemade or store-bought)
- Cheese cubes or cheese slices (cheddar, mozzarella, gouda, or your favorite!)
- Carbs
- Crackers (whole-grain, gluten-free, or your go-to type)
- Mini pita breads
- Breadsticks
- Tortilla chips
- Veggies & Fruits
- Carrot sticks or cucumber slices
- Cherry tomatoes
- Apple slices, grapes, or berries (perfect for adding a sweet touch)
- Dips & Extras
- Hummus or guacamole for dipping
- Yogurt (plain or flavored)
- Peanut butter or almond butter
These ingredients are the building blocks for a variety of combinations. You can easily mix and match depending on what you have on hand or what you feel like eating! The best part? You can get creative with flavors, textures, and presentation.
Ingredient Proportions for One Serving
When assembling your Lunchable, here’s a general guide to help with portions:
| Component | Amount per Serving |
| Protein (Deli meats) | 2-3 slices (or equivalent) |
| Cheese | 2-3 cubes or slices |
| Carbs (Crackers) | 6-8 crackers or 1-2 breadsticks |
| Veggies/Fruits | 1/2 cup total (mix of veggies and fruit) |
| Dip/Extras | 2-3 tablespoons (hummus, yogurt, etc.) |
Chef Sophie LeClair’s Tip: For a fun twist, consider adding a small portion of trail mix or a few dark chocolate squares to sweeten the deal.
Ready to assemble? In the next section, I’ll guide you through putting everything together to create the best Lunchables ever.
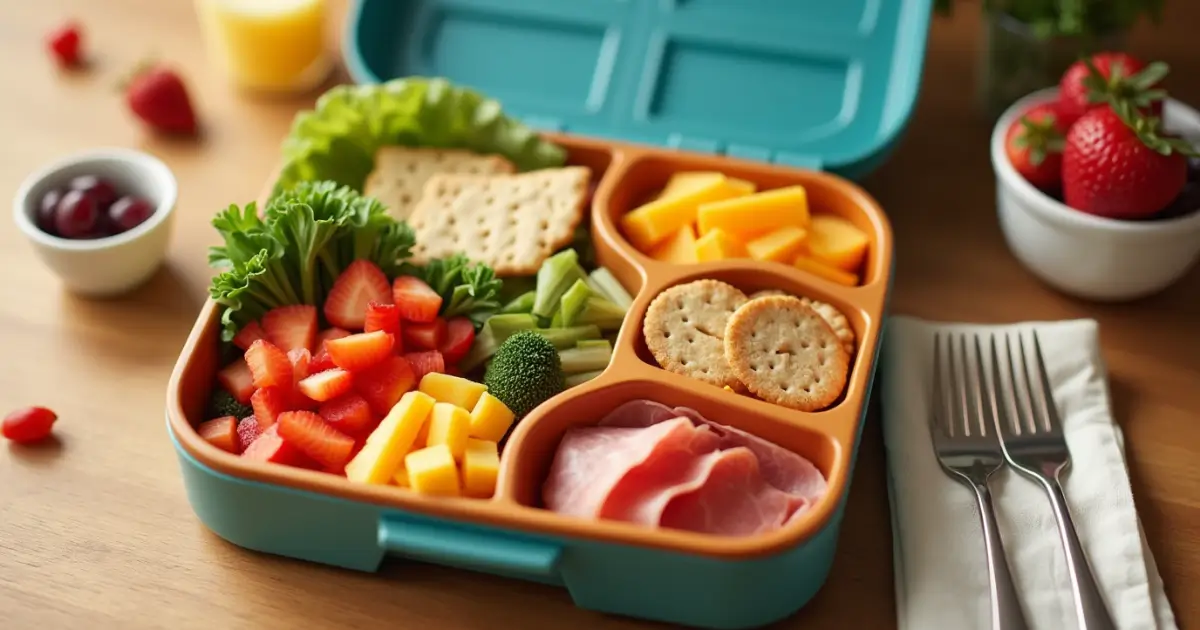
How to Make These Quick & Easy Lunchables
Now that you have your ingredients ready, it’s time to assemble your Lunchable. This process is simple, fun, and completely customizable to your taste. Whether you’re preparing for a busy day ahead, making a kid-friendly snack, or creating a quick lunch, these steps will guide you through making the best Lunchables in just minutes.
Step-by-Step Assembly
- Start with the Base
Begin by selecting your carbs crackers, mini pita bread, or breadsticks. Arrange them neatly in a small container or lunchbox. This will be the base of your Lunchables and will hold everything together. - Add the Proteins
Choose your favorite protein source. If you’re using deli meats, stack them up and cut them into smaller pieces for easy picking. Add your cheese cubes or slices next. Layer them neatly beside the carbs. For an added twist, add a hard-boiled egg or a couple of mini meatballs for extra protein. - Incorporate the Veggies & Fruits
Pack some veggies like carrot sticks, cucumber slices, or cherry tomatoes. These will add a nice crunch and balance out the flavors. Don’t forget about the fruit apple slices, grapes, or berries will provide a sweet and refreshing contrast. You can mix the veggies and fruits, but if you prefer, separate them into smaller sections for easy access. - Include a Fun Dip or Extra
Now it’s time to elevate your Lunchable with some dips! Whether it’s creamy hummus, tangy guacamole, or a dollop of yogurt, add 2-3 tablespoons of your favorite dip. For a sweet option, you can also pack a small serving of peanut butter or almond butter. - Pack it All Together
Once all the components are placed in the container, make sure there’s enough space so the items don’t get squished. If you’re packing multiple Lunchables, consider using compartmentalized containers to keep everything fresh and separated.
Pro Tip for Presentation
To make your Lunchable even more appealing, consider cutting the cheese slices into fun shapes using a small cookie cutter or arranging the fruits and veggies in a colorful pattern. These little touches will make the meal more exciting, especially for kids.
Assembling for Different Occasions
You can customize the Lunchable for any occasion! Here are a few ideas:
- For a quick snack: Stick with crackers, cheese, and fruits for a light bite.
- For a school lunch: Add protein-packed items like deli meats, hard-boiled eggs, and veggies for a filling meal.
- For a road trip: Choose carbs like tortilla chips, nuts, and fruit snacks that can be easily eaten on the go.
Chef Sophie LeClair’s Tip: Use fresh, organic ingredients when possible for the best flavor and nutrition. You can even pre-assemble these Lunchable the night before for a hassle-free lunch the next day.
Pro Tips to Upgrade Your Lunchables Like a Chef
You’ve got the basics down, but why not take your Lunchable to the next level? As a world-class chef, I’ve got a few pro tips that will elevate your quick and easy Lunchable into something truly special. These small tweaks can make a big difference in both taste and presentation.
1. Experiment with Homemade Crackers
While store-bought crackers are convenient, why not make your own? You can easily prepare whole grain or flaxseed crackers at home, giving your Lunchable an added nutritional boost. Homemade crackers are surprisingly simple to make, and they taste far better than the store-bought variety.
2. Add Fresh Herbs & Spices
Spice up your Lunchable by adding fresh herbs like basil or oregano to your cheese or meats. These fresh touches will not only boost flavor but also give your Lunchables a gourmet touch. A sprinkle of sea salt or cracked pepper on your veggies or fruits can also make a big difference.
3. Go Beyond the Basics with a Unique Dip
Instead of sticking with traditional hummus or guacamole, try making your own homemade dips. A spicy yogurt dip or a roasted red pepper hummus will add complexity and make your Lunchable extra memorable.
4. Customize for Dietary Preferences
No two people have the same tastes, so don’t be afraid to customize your Lunchable to suit dietary preferences.
- For vegetarian options, focus on vegetables, cheese, and whole grains.
- If you’re low-carb, swap out crackers for lettuce wraps or almond flour crackers.
- For a keto-friendly lunch, add avocado slices, jerky, or cheese crisps instead of traditional crackers.
5. Include Sweet & Savory Pairings
A balance of sweet and savory can make your Lunchables more exciting. Combine sliced apple or grapes with sharp cheddar cheese for a flavorful contrast. You can also pair dark chocolate squares with nuts or cheese to create a satisfying balance of flavors.
6. Make It a Themed Lunchable
Kids love themed meals, and it’s a great way to get them excited about eating. Whether it’s a Superhero Lunchable with “power-up” snacks or a Tropical Lunchable with pineapple and coconut chips, creating themed versions adds a touch of fun.
7. Keep It Fresh & Well-Packed
To ensure everything stays fresh, consider packing your Lunchable in compartmentalized containers. This helps keep items like crackers and fruits separate from moist ingredients like dips or yogurt. If you’re prepping for the next day, mini ice packs will keep things cool and fresh.
Pro Chef’s Trick: Pre-Assemble for the Week
For a busy week ahead, try pre-assembling multiple servings of Lunchable and storing them in airtight containers. This not only saves time but also helps with portion control, making it easy to grab and go without the fuss of last-minute prep.
Chef Sophie LeClair’s Tip: Always use seasonal ingredients for the best flavor. If you’re making Lunchable in the summer, load up on fresh cucumbers, tomatoes, and stone fruits like peaches and plums. In the winter, try roasted root veggies or citrus fruits for a fresh twist.
Serving Suggestions for Your Delicious Lunchable
Now that you’ve assembled your Lunchable, it’s time to get creative with how you serve them. Serving these fun, customizable boxes is an excellent way to make mealtime feel exciting, whether you’re making them for a family lunch, picnic, or school snack. Here are some of the best ways to serve your Lunchables and ensure they’re both delicious and visually appealing:
1. Serve Them in Fun Containers
Presentation is key! Use compartmentalized lunchboxes, bento boxes, or small reusable containers to keep everything organized. These containers also allow you to easily separate different ingredients, which helps maintain freshness and prevents any sogginess. Plus, they make your Lunchable look like a well-thought-out, gourmet snack.
2. Create a Themed Lunchable
If you’re looking to add a little excitement, why not create a themed Lunchable? Here are a few ideas to make mealtime even more fun:
- Superhero Lunchable: Use cheese slices to create the shape of capes or masks. Add fruits and veggies as “power-ups.”
- Beach Party Lunchable: Serve with coconut chips, pineapple slices, and cheese crackers to bring in that tropical feel.
- Rainbow Lunchable: Fill the sections of your lunchbox with a variety of colorful fruits and veggies, making a vibrant, healthy feast.
3. Pair with a Refreshing Drink
No Lunchable meal is complete without a refreshing drink to pair with it. Here are a few great options to complement your quick lunch:
- Fruit Infused Water: Add slices of lemon, lime, or berries to water for a refreshing twist.
- Iced Tea: Lightly sweetened iced tea with a slice of lemon is a great choice.
- Fruit Juice: For a sweeter option, serve with fresh orange juice or apple cider.
4. Make It a Meal with Side Dishes
While Lunchable are a great standalone snack, you can also make them into a full meal by serving them alongside simple side dishes. Consider:
- Mixed greens salad with a tangy vinaigrette for a light, fresh side.
- Mini sandwiches or wraps using the same ingredients from your Lunchables.
- Rice cakes or whole grain crackers if you want something a bit more filling.
5. Perfect for Meal Prep or On-the-Go
One of the best things about Lunchables is how easy they are to prep ahead of time. If you’re planning for the week, prepare multiple servings and store them in the fridge for a quick grab-and-go lunch option. Simply pack your Lunchables into airtight containers or bento boxes, and you’ll have a fresh meal ready to enjoy at a moment’s notice.
6. Add Extra Toppings for Customization
The beauty of Lunchables is their versatility. You can always add a little something extra, like:
- Chia seeds or sunflower seeds for added crunch and nutrition.
- Honey or fruit jam to give your cheese and crackers combo a sweet twist.
- Olives or pickles for a salty bite that complements the other flavors.
Chef Sophie LeClair’s Tip: To ensure your Lunchables stay fresh throughout the day, pack ice packs in the lunchbox to maintain that perfect temperature. If you’re preparing them for kids, it’s a great way to keep things cool until lunchtime.
Serving for Special Occasions
Whether it’s a casual picnic, a work lunch, or a birthday party, Lunchables can be dressed up for special occasions. Consider:
- For a Kid’s Birthday Party: Create a DIY Lunchable station where guests can assemble their own customized creations.
- For a Picnic: Serve Lunchables alongside a charcuterie board or fruit platter for a well-rounded outdoor meal.
- For a Game Day Snack: Put together a finger-food-friendly version with sliders, mini pizzas, and chips to pair with your Lunchables.
The options are endless when it comes to serving your Lunchables. From the way you arrange the ingredients to the sides and drinks you choose, you have the power to customize and make each serving something special.
Conclusion: Why These Lunchables Are a Must-Try

By now, you’ve learned how easy it is to create your own Lunchables that are quick, delicious, and perfectly customizable. Whether you’re making them for yourself or your family, these homemade Lunchables will be the highlight of your day. You can enjoy them as a satisfying snack, a wholesome lunch, or even a fun addition to a picnic or party.
The beauty of these recipes is their versatility. You can easily mix and match the ingredients based on your dietary needs, preferences, and the time you have on hand. Plus, they’re a fun way to get creative in the kitchen, letting you experiment with different flavors and combinations. With the help of a few pro tips, you can turn your Lunchables into a gourmet snack that looks as good as it tastes.
Chef Sophie LeClair’s Tip: The key to perfect Lunchables is to ensure you balance the flavors and textures. Adding a variety of textures crunchy crackers, smooth spreads, and juicy fruits will create a more satisfying and fun eating experience.
Whether you’re looking for a quick bite during a busy workday or a fun lunch for the kids, these Lunchables recipes are guaranteed to impress. You’ll find yourself making them again and again, thanks to how simple and enjoyable they are.
FAQs: Your Essential Guide to Perfecting Homemade Lunchables
If you’re new to making your own Lunchables or want to level up your creations, you might have some questions. Don’t worry I’ve got you covered! Below, I’ve answered some of the most common questions to help you make the best Lunchables possible, tailored to your tastes and preferences.
1. Can I make Lunchables ahead of time?
Lunchables are perfect for meal prep. You can assemble everything the night before or even for the whole week. Simply store them in airtight containers or bento boxes in the fridge to keep everything fresh. Just remember to pack an ice pack if you’re taking them on the go, especially if you include ingredients like cheese, meats, or anything that’s temperature-sensitive.
2. How do I keep my Lunchables from getting soggy?
Great question. The key to keeping your Lunchables fresh and crisp is to store your ingredients separately until it’s time to eat. For example, place crackers and dips in their own compartments to avoid them getting soggy. Also, consider adding a paper towel or small wax paper between moist ingredients like fruits or meats and your crackers.
3. Can I use gluten-free or dairy-free ingredients in my Lunchables?
Of course! One of the best things about making your own Lunchables is how customizable they are. You can easily swap ingredients to meet dietary needs. For gluten-free options, use rice cakes or gluten-free crackers. For dairy-free, swap out regular cheese for dairy-free cheese or even hummus as a spread.
4. How can I make my Lunchables healthier?
If you want to boost the nutrition of your Lunchables, consider the following tips:
- Add more veggies: Include fresh carrot sticks, cucumber slices, or bell pepper strips for added crunch and vitamins.
- Use whole-grain crackers or rice cakes instead of traditional white crackers.
- Add nuts or seeds for a healthy fat source and extra protein.
- Incorporate lean proteins like turkey slices or chicken breast instead of processed meats.
5. Can I use this recipe for kids?
Yes, this recipe is great for kids. Lunchables are fun and interactive, allowing kids to build their own meals with ingredients they enjoy. You can customize it to suit their preferences, offering healthier options like fresh veggies, cheese cubes, and lean proteins. Plus, they’ll love the DIY aspect of creating their own snack.
6. How do I make my Lunchables more exciting for a party?
If you’re serving Lunchables at a party or special event, try creating a Lunchables station where guests can assemble their own snack boxes. Here’s how to do it:
- Set up a variety of crackers, cheeses, dips, and veggies.
- Provide fun additions like grapes, mini pickles, and miniature sandwiches.
- Offer different spreads such as hummus, pesto, or cream cheese for added variety.
7. What is included in a Lunchables Pizza kit?
typical Lunchables Pizza kit includes mini pizza crusts, pizza sauce, shredded cheese, and pepperoni (in some versions). Some packs also come with a drink and a dessert.
8. Is there a Lunchables collaboration with MrBeast?
As of now, there is no official Lunchables collaboration with MrBeast. However, MrBeast is known for his partnerships with various food brands, so a future collaboration is possible.
9. How much do Lunchables cost?
The price of Lunchables varies by location and retailer, but they typically range from $1.50 to $3.50 in the US, depending on the variety and included extras like drinks or snacks.
10. Are Lunchables available in Canada?
Yes, Lunchables are available in Canada. However, some flavors and ingredients may differ slightly from the US versions due to regional preferences and food regulations.
11. What types of Lunchables snacks are available?
Besides the classic pizza, cracker stackers, and nachos, Lunchables also offer snack-sized options like Lunchables Snack Duos, which include a mix of sweet and savory treats like cheese, crackers, nuts, and chocolate-covered snacks.
12. Who owns Lunchables?
Lunchables is owned by The Kraft Heinz Company, a major food and beverage company based in the United States.
13. What is included in Lunchables Nachos?
Lunchables Nachos usually come with bite-sized tortilla chips, nacho cheese dip, and salsa. Some versions also include a drink or a dessert like a cookie or candy.
Chef Sophie LeClair’s Tip: Experiment with ingredients to keep your Lunchables fresh and exciting. The beauty of this recipe is that it can be tailored to any taste or dietary preference. Have fun with the process, and feel free to get creative with new combinations.
Did You Our Recipe ?
I Like this recipe is the best